简介
Hugo 作为一个静态网站生成器,默认是没有搜索功能的,而如果想要实现搜索功能,首先需要自己生成索引,然后通过集成开源的搜索工具或者使用第三方服务来实现搜索功能。
我这里选择的是使用微软的 Azure Search 来实现,至于选择的原因纯粹是个人爱好,因为事实上我的博客的文章量仅需开源的搜索工具即可处理过来,不过换言之使用 Azure Search 的免费订阅也不会遇到性能瓶颈。
主要步骤
- 生成网站数据
- 注册 Azure Search 服务
- 在 Azure Search 上添加索引
- 将之前生成的网站数据上传至 Azure Search
- 前端配置(简略)
- 自动化
生成网站数据
首先要让 Hugo 在生成网站主页的同时生成一个 json 文件,这个 json 文件將保存我们的网站数据,在 Hugo 的设置(以 toml 格式为例)中添加:
[outputFormats]
  [outputFormats.json]
    baseName = "index"
    isPlainText = true
    mediaType = "application/json"
    path = "d4uCXE4MHp3GC"

[outputs]
home = ["HTML","json"]
这样 Hugo 在生成主页时就会自动生成 d4uCXE4MHp3GC/index.json,这里我使用了一个随机生成的目录名,因为我不想这个文件的位置被别人猜到。
下一步需要告诉 Hugo 应该如何生成这个文件的内容,也就是把各篇文章的标题、时间、内容和标签等按照一定格式输出。
而大多数 Hugo 主题都会有自定义文章样板(位置位于 themes/xxx/archetypes/default.md,没有的话就是使用 Hugo 的默认样板),这里以我的文章样板为例:
---
title: "{{ replace .Name "-" " " | title }}"
date: {{ dateFormat "2006-01-02" .Date }}
lastmod: {{ dateFormat "2006-01-02" .Date }}
draft: true
tags:
---
其实比起来默认的文章样板,无非是增加了一个 lastmod(最后编辑)日期,以及一些 tags(标签),想要生成对应的 json 文件,在 themes/xxx/layouts/_default/ 下新建 index.json:
{"value": [
  {{- range $index, $e := .Site.RegularPages }}
  {{- if $index }},{{- end }}
  {
    "id": "{{ .File.UniqueID }}",
    "url": {{ .Permalink | jsonify }},
    "title": {{ .Title | jsonify }},
    "date_published": {{ .Date.Format "2006-01-02" | jsonify }},
    "date_modified": {{ .Lastmod.Format "2006-01-02" | jsonify }},
    "description": {{ .Summary | jsonify }},
    "content": {{ .Plain | jsonify }},
    {{ if (and (isset .Params "tags") (ne .Params.tags nil)) -}}
    "tags": {{ .Params.tags | jsonify }}
    {{- else -}}
    "tags": []
    {{- end }}
  }
  {{- end }}
]}
这样就会生成一个列表,而列表里的每个 object 对应一篇文章,而其中包含的各个 key 所表示的内容:
id是每篇文章的唯一 ID,使用 Hugo 生成的即可。url、title、date_published、description和content分别对应文章的地址、标题、发布日期、描述和内容。date_modified对应了我的文章模板中的lastmod。tags对应了我的文章模板中的tags,使用 if 判断没有 tags 或者其值为空则直接使用"tags": [],不然生成时会报错。
都弄好后就可以运行 hugo 命令来生成网站数据了。
注册 Azure Search 服务
直接去 https://portal.azure.com 添加 Azure Cognitive Services,可以使用微软账号登录。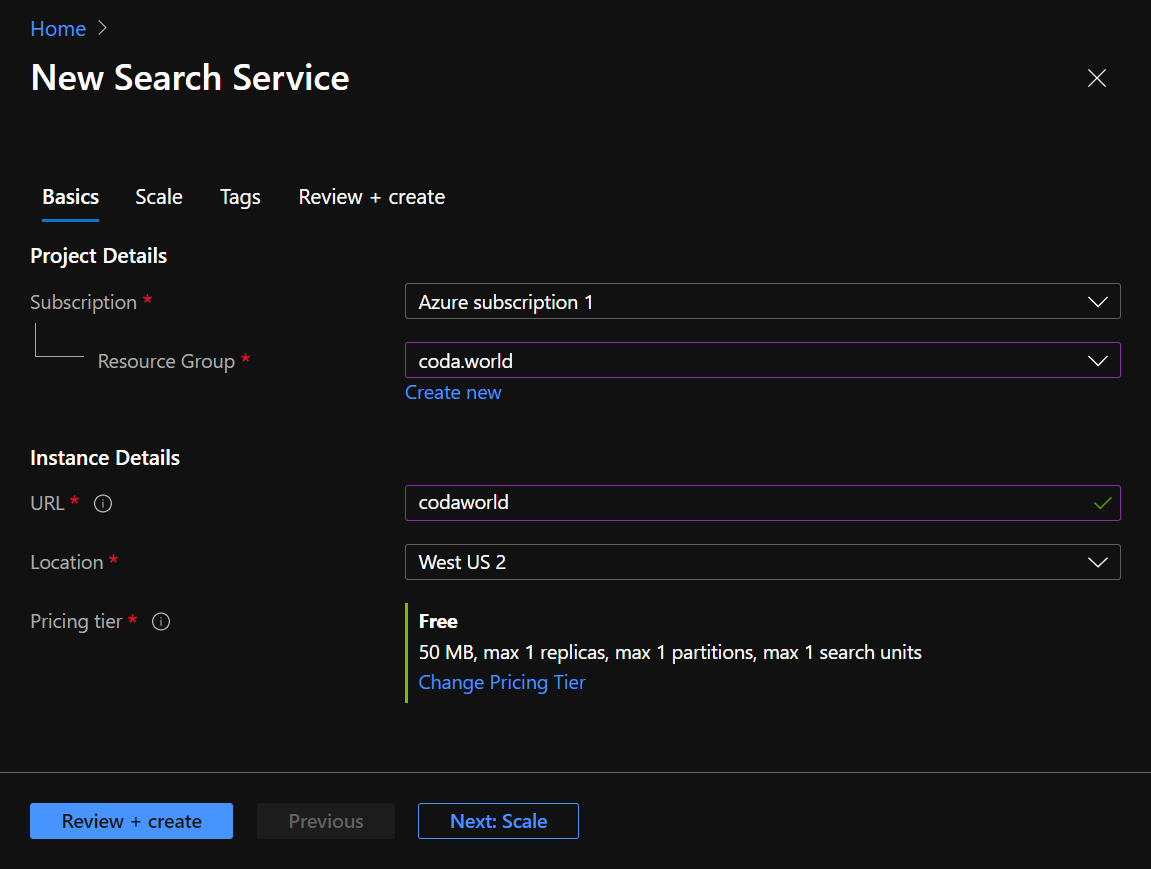
Resource Group随便起个自己喜欢的名字就好,反正别人看不到,我直接用的网站名。URL也随意,只会影响 API 的网址,虽然写着URL,但实际上需要填的是Service Name,也就是给自己的服务起个名即可,不用打一个完整的网址。Location也就是服务器的位置,请根据自己的网站的目标群体来选择。Pricing Tier自然是点Change Price Tier然后选择免费。
建立好之后在左侧的面板选择 Keys,首先记下其中一个 admin key,然后点 Add 添加一个 query key。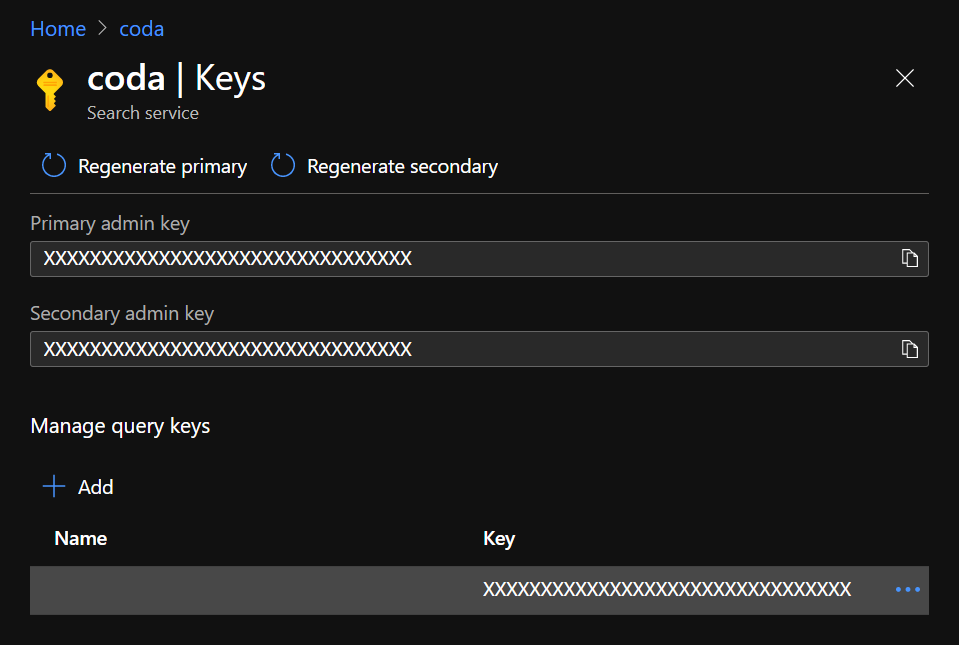
admin key在添加索引或者上传数据时需要使用。query key在查询数据也就是进行搜索时需要使用。
在 Azure Search 上添加索引
我们之前已经生成好了网站数据,下一步就是告诉 Azure Search 如何处理我们的网站数据,也就是添加索引。添加索引可以直接在 Azure 的控制面板进行,不过我选择的是通过它的 REST API 进行,随便找个你喜欢的本地目录新建 azuresearchindex.json,然后添加内容:
{
  "name":"posts",
  "fields":[
    {"name":"id","type":"Edm.String","searchable":false,"retrievable":true,"filterable":false,"sortable":false,"facetable":false,"key":true},
    {"name":"url","type":"Edm.String","searchable":false,"retrievable":true,"filterable":false,"sortable":false,"facetable":false},
    {"name":"title","type":"Edm.String","searchable":true,"retrievable":true,"filterable":true,"sortable":false,"facetable":true,"analyzer":"zh-Hans.lucene"},
    {"name":"date_published","type":"Edm.DateTimeOffset","searchable":false,"retrievable":true,"filterable":true,"sortable":true,"facetable":true},
    {"name":"date_modified","type":"Edm.DateTimeOffset","searchable":false,"retrievable":true,"filterable":true,"sortable":true,"facetable":true},
    {"name":"description","type":"Edm.String","searchable":false,"retrievable":true,"filterable":false,"sortable":false,"facetable":false},
    {"name":"content","type":"Edm.String","searchable":true,"retrievable":false,"filterable":false,"sortable":false,"facetable":false,"analyzer":"zh-Hans.lucene"},
    {"name":"tags","type":"Collection(Edm.String)","searchable":true,"retrievable":true,"filterable":true,"sortable":false,"facetable":true,"analyzer":"zh-Hans.lucene"}
  ],
  "scoringProfiles":[
    {
      "name":"default",
      "text":{"weights":{"title":5,"tags":2,"content":1}},
      "functions":[
        {"type":"freshness","fieldName":"date_published","boost":3,"interpolation":"quadratic","freshness":{"boostingDuration":"P365D"}},
        {"type":"freshness","fieldName":"date_modified","boost":2,"interpolation":"quadratic","freshness":{"boostingDuration":"P730D"}}
      ]
    }
  ],
  "defaultScoringProfile":"default",
  "corsOptions":{
    "allowedOrigins":["https://example.com"],
    "maxAgeInSeconds":600
  }
}
name表示这个索引的名字(Index Name)。fields解释了如何将之前生成的网站数据中的 key 转化为相对应的 Azure Search 数据库中的字段:name自然表示 object 中 key 的名字。type表示所对应的字段的类型,比如字符就是Edm.String,日期就是Edm.DateTimeOffset。searchable表示这个字段下的值是否会被当作可搜索的内容。retrievable表示是否会在索的结果中显示这个字段。filterable表示该字段是否可以被筛选。sortable表示该字段是否可以用作排序。facetable表示该字段是否可以被统计,这条一般与filterable设置成一样的值即可。key表示该字段是否是主键(唯一)。analyzer表示搜索时应该使用哪种算法来分析该字段中的值,我所有可被搜索的文本字段都使用了zh-Hans.lucene。
scoringProfiles是我自定义的排序政策,简单来说就是标题和标签占的权重更高,然后最新发布和最近更新的文章也会有加权。defaultScoringProfile表示把上面自定义的排序政策作为默认的排序政策。corsOptions很重要,一定要填好自己调用 API 时的域名,不然搜索时可能因为 CORS 限制而被拒绝访问,调试期间可以直接弄成"allowedOrigins":[*]。
至此索引已经准备好了,下一步就是把它应用到 Azure Search 中,只需要发送一个 HTTP POST 请求即可,所以用什么工具都无所谓,这里直接以 curl 为例:
curl --data "@/path/to/azuresearchindex.json" \
     --header "Content-Type: application/json"
     --header "api-key: [Admin Key]"
     https://[Service Name].search.windows.net/indexes/[Index Name]?api-version=2019-05-06
自行替换:
/path/to/azuresearchindex.json: 前面生成的 json 文件的路径,注意前面有个@。[Admin Key]: 上一步中记下的admin key。[Service Name]: 上一步中填写的Service Name(URL)。[Index Name]:azuresearchindex.json中name的值。
成功的话会返回 201 Created。
如果需要删除索引,发送 HTTP DELETE 请求到相同的地址即可:
curl -X DELETE \
     --header "Content-Type: application/json"
     --header "api-key: [Admin Key]"
     https://[Service Name].search.windows.net/indexes/[Index Name]?api-version=2019-05-06
成功的话会返回 204 No Content。
将之前生成的网站数据上传至 Azure Search
如果第二步中生成的网站数据(index.json)刚好也存储在 Azure 上,可以去控制面板里设置直接读取,不过由于大部分人都没有这样的条件,这里就不详谈了。
所以同样,我们通过 Azure Search 的 REST API 来上传,仍旧以使用 curl 为例:
curl --data "@/path/to/index.json" \
     --header "Content-Type: application/json"
     --header "api-key: [Admin Key]"
     https://[Service Name].search.windows.net/indexes/[Index Name]/docs/index?api-version=2019-05-06
需要注意的事情与创建索引时差不多,另外注意两个 API 的网址是有区别的,成功时会返回 200 OK。
前端配置(简略)
然后就能使用 Azure 搜索了,直接浏览器里访问:
https://[Service Name].search.windows.net/indexes/[Index Name]/docs?api-version=2019-05-06&api-key=[Query Key]&$count=true&search=你要搜索的内容
依旧记得替换 [Service Name]、[Index Name] 和 [Query Key], 注意这里使用的是 query key 而不是 admin key。
访问之后返回的是一个 JSON object,包含了搜索的结果等内容,请根据自己的需求在前端进行使用。
还可以通过加上 &$skip= 和 &$top= 来分别设定跳过多少个结果和只显示多少个结果,例如只显示第 10 ~ 15 个结果:
https://[Service Name].search.windows.net/indexes/[Index Name]/docs?api-version=2019-05-06&api-key=[Query Key]&$count=true&search=你要搜索的内容&$skip=10&$top=5
自动化
我们总不希望每次网站生成新的内容时都手动添加生成的网站数据对么?这里提供一个最简单的自动化方案,直接把删除索引、新建索引和上传数据放到一个 shell sctipt 里这还用你教:
#!/bin/bash
SERVICENAME=xxxxx
INDEXNAME=xxxxx
ADMINKEY=xxxxx
INDEXPATH=xxxxx
DATAPATH=xxxxx
curl -X DELETE \
     --header "Content-Type: application/json"
     --header "api-key: $ADMINKEY"
     "https://$SERVICENAME.search.windows.net/indexes/$INDEXNAME?api-version=2019-05-06"
curl --data "@$INDEXPATH" \
     --header "Content-Type: application/json"
     --header "api-key: $ADMINKEY"
     "https://$SERVICENAME.search.windows.net/indexes/$INDEXNAME?api-version=2019-05-06"
curl --data "@$DATAPATH" \
     --header "Content-Type: application/json"
     --header "api-key: $ADMINKEY"
     "https://$SERVICENAME.search.windows.net/indexes/$INDEXNAME/docs/index?api-version=2019-05-06"
理论上来讲,其实只需要进行上传数据这部分就可以了,而当某一篇文章的唯一 ID 发生变化,或者这篇文章被删除了的时候,才需要去删除这篇文章在 Azure Search 中的数据。但是懒人是不会想去手动删除的,而自动删除又很复杂,好在个人站点一般文章数很少,倒不如直接把索引删了然后重建来得方便。